Create a Custom App Policy
In addition to the MTT Managed App Policies that are maintained by the MTT researchers, Org and Policy Admins can create custom App Policies tailored for the Organization. Many App Policies use Threat Indicators to detect one or more possible threats from mobile applications on the devices in an Organization. In some cases the policy does not use a TI and uses policy filters instead. See Appthority MTP Overview for a discussion about policies. See About the App Policies Tab for more details about the tab.
App Policy Overview
Before creating a custom App Policy, first review the MTT-Managed Policies to see if what you want has already been configured. Then browse the TIs and decide which ones to use, and whether to group some together in a single policy. Activate the TIs you want to use.
When you create a custom App Policy, it contains one or more activated TIs, some of which have parameters. You can optionally use policy filters to narrow the scope of the policy. You can optionally change the App Policy Risk Score, to either make it higher or lower than the default.
What you do after the policies are defined depends on your use case scenario:
- In the case where you are using the MTP Mobile App, you assign the App Policy to a Remediation Policy. When you are ready to roll it out and start using it to monitor devices, you activate both policies.
- In the case where you are using an EMM to handle remediation, and the EMM Connector is set up and integrated with your EMM, when you activate the App Policy it immediately goes into effect and communicates with the EMM. You explicitly activate the policy using the Actions > Activate menu.
- If you are not performing remediation and just want to see what apps are in violation of a policy, do not activate the policy. When a policy is saved, Appthority MTP determines what apps are in violation of the policy and shows a link to them, if any, next to the policy name. You can click it to go to the Apps tab to see more information.
The following steps describe activities involved in creating App Policies. Many are optional or situational, depending on what you need the policy to accomplish.
- Prior to creating a custom App Policy
- Start creating a custom App Policy
- Add Threat Indicators
- Specify TI parameters, if any
- Add App Policy filters
- Save a Custom App Policy
- Assign the App Policy to a Remediation Policy (for MTP Mobile App)
- Configure policy enforcement in the EMM
- Activate the App Policy
After you create and activate App Policies, you can:
- Modify them in the same Compliance > App Policies tab.
- See them listed and perform various actions on them in the Apps tab sidebar. See Manage Apps.
- Monitor policy violations using the Dashboard. See Use the Dashboard.
App Policy Steps
Prior to creating a custom App Policy
Before you begin, make sure the following prerequisites are in place.
- You have either the Org Admin or Policy Admin role on your user account.
- Any TIs you want to use in policies are activated. See Configure Threat Indicators.
- Any TIs you want to use in policies have a Risk Level of 1 or greater. See Configure Threat Indicators.
- If Appthority MTP is integrated with an EMM, verify that:
- The EMM is running.
- The EMM Connector integration with the EMM is Active in the Admin > Organization tab.
To start creating a custom App Policy
- Go to Compliance > App Policies.
By default a new policy template displays in the main section.
Tip: If you previously navigated away from the default, you can click + New App Policies.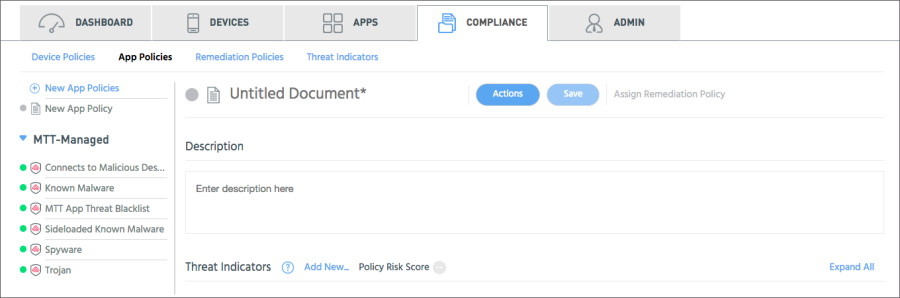
- Enter a unique name for the policy.
- Enter a description for the policy. For example, you can say something about what threats it addresses, or when and who added the policy.
To add Threat Indicators
Tip: If the policy will not use TIs, skip to To add App Policy filters.
- In the Threat Indicators section of the App Policies tab, click Add New.
The App Threat Indicators popup opens. It lists and categorizes all Tis that apply to apps, are activated, and have a Risk Level of 1 or above.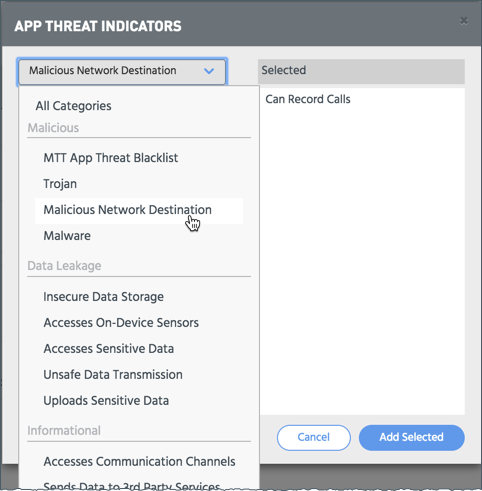
- Select a TI and click the right arrow to add it to the policy. Repeat to select additional categories and TIs.
Tips:- If you do not see a TI that you expect to see in this list, check and make sure the TI is activated and has a Risk Level of 1 or above.
- Informational TIs that have their default Risk Level 0 do not appear in this list. To use an Informational TIs in a policy, change its Risk Level and activate it.
- See Configure Threat Indicators.
- Click Add Selected.
The Threat Indicators section lists the selected TIs and shows important information about each. - Optionally, if a TI has parameters, set the parameters for the TI.
- Optionally, if you added multiple TIs, set the match condition for the TIs.
To specify TI parameters, if any
A TI may include parameters that further refine the TI threat criteria. If there are multiple parameters, the TI evaluates as an AND condition (all parameters are considered together, not just one or the other).
Possible parameters include:
- URL Rep Score: A range of 1 to 100 for you to indicate at what URL reputation score the TI will flag a violation. Enter a number below which the TI will flag a violation. The lower the number, the higher the risk. For example:
- 1-20: High risk
- 21-40: Suspicious
- 41-60: Moderate risk
- 61-80: Low risk
- 81-100: Trustworthy
URL Rep Scores are useful for monitoring apps that send data to websites. For example, when using the "Sends Data Unencrypted" TI, you may decide to flag an app when the URL Rep Score of the site receiving the data is less than 80.
- Country: To have the policy trigger when any TI is violated for a particular country, select a country from the Country menu. For example, when using the "Sends Data Unencrypted" TI, you may decide to flag an app when it is sending unencrypted data to Russia.
To add App Policy filters
Appthority MTP can further refine violation detection against a set of filters.
- In the Filters section, click Filters.
- Select a type of filter from the popup.
The filter type displays in the Filter section. For example, you can filter for only iOS apps that are publicly available on the App Store.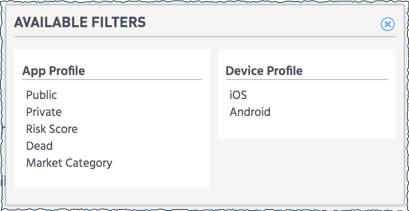
Tip: To remove a filter from the policy, click its X button. The filter moves back to the popup.
App Policy filters include:App Profile Policy applies to... Public Apps available on the public app stores. Private Apps distributed through private channels. Risk Score Apps with App Risk Scores in the specified range. Dead Apps that have been removed from the app stores. Market Category The category of the app in the app store, for example "Utilities" or "Photo Video". When you type in the dropdown box a list of possible matches helps you locate the category name. 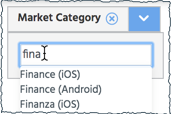
You can use more than one Market Category. They are available in multiple languages for the multiple app stores.Device Profile iOS iOS devices Android Android devices - Click X to exit the popup.
To save a Custom App Policy
Click Save. Appthority MTP immediately determines what apps are in violation of the policy and shows a link to them, if any, next to the Save button. 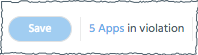
Tips:
- Click the Apps in violation link to see details about violations.
- As you update a policy, the list of apps in violation may change.
- A Custom Policy is not actively triggering remediation or EMM enforcement when it is saved the first time. A later step is required to activate the policy.
To assign the App Policy to a Remediation Policy (for MTP Mobile App)
Tip: Since there can be more than one App Policy assigned to a single Remediation Policy, you could create all the App Policies first and then assign them to a single Remediation Policy at the same time. See Create a Custom Remediation Policy.
- Click Assign Remediation Policy.
The Remediation Policies tab opens. - Name the new Remediation Policy, assign device groups to it, and set its Remediation Actions. See Create a Custom Remediation Policy.
To configure policy enforcement in the EMM
With EMM integration, see:
To activate the App Policy
When you activate the App Policy it immediately engages in the remediation activities of either the MTP Mobile App or EMM or both.
Tip: Even if the policy is not activated, Appthority MTP processes the policy against the list of Apps and provides analysis in the Apps tab.
- In the App Policies tab for the relevant policy, click Actions > Activate.
- In the dialog, click Yes, Proceed.
Copyright ©Appthority, Inc. 2017-2018 All Rights Reserved. Contact Support